
If your lawn has bare spots or damaged patches from construction, utility work, or wear and tear from pets or foot traffic, patching with individual rolls of new sod is one of the fastest ways to restore a thick, healthy lawn.
Patching with single rolls of new sod delivers instant curb appeal and blends seamlessly with your existing turf when installed correctly.
In this guide, we’ll walk you through how to patch an existing lawn with new sod, including how to prepare the area, match your grass type, install sod properly, and care for it so the new patches root quickly and thrive.
Whether you’re fixing a small dead spot or refreshing a larger section of your yard, our sod patching tips will help you repair your lawn and bring it back to its glory.
Top: Several damaged spots in the lawn.
Middle: Squares that have been cut out with Soil³ compost added.
Bottom: After a few weeks, the new patches are barely noticeable.
Patching Lawns with Sod Rolls or Pieces
Bill Gates, Steve Jobs, and Jeff Bezos have turned me into the impatient, “Gotta Have it Now” person that I am today. Bill developed software that drove the proliferation of PCs, Steve created a small personal device to access information anywhere, and Jeff figured out how to deliver just about anything you want within a day or two using the technologies that Bill and Steve developed! Thanks to these guys, anything less than “RIGHT NOW!” is unacceptable in my world.
Sod is the original form of instant gratification, so for you impatient, “Gotta Have it Now” lawn enthusiasts out there, sod is the answer to unsightly areas in your lawn. In most cases, you can use sod to renovate unsightly areas of your lawn in just an hour or so!
Here are Super-Sod's steps for making this happen.
Sod Patching Tools List
- Flathead (square) shovel or edging shovel
- Garden rake or hoe
- Garden hose
Sod Patching Shopping List
- Soil³ organic compost – 1 small bag per 30 square feet of sod (equal to 3 rolls from Super-Sod)
- Rolls of new sod
You can purchase individual rolls of sod online and get prices there too. If you need to speak with someone, call us at 888-360-1125.
If you need help making sure that your new patches match the rest of your lawn, your local Super-Sod store will be glad to help. The best way to determine which type of grass you have is to dig up a small square (2-4 inches) and bring it to the store. (Make sure your sample is fresh - if it is old and dried up it will be hard to identify.) Let our experts take a look and you can compare it to the sample grass plots.
Steps for Patching Sod with Rolls or Pieces
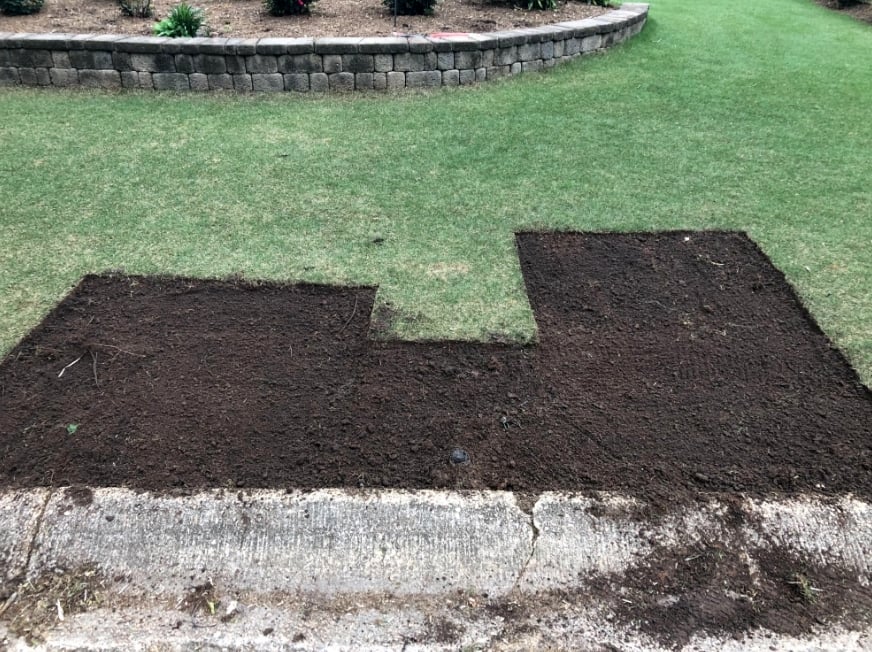
- Cut a square outline: Use a flathead or edging shovel to cut straight down through your existing grass and create the border of where you’ll be removing the damaged grass.

- Remove existing vegetation: Lower the shovel to an angle and slide it underneath the grass or other vegetation that you are removing. Remove as much as possible, whether dead or alive.

- Break up the dirt: Once the vegetation is removed, take a landscape rake or hoe and loosen the top 2 or 3 inches of soil. You don’t want compacted dirt beneath your new sod. You will probably need to remove some of the loosened dirt (see next step). Rake the broken up dirt to make it flat and very lightly tamp it down.

- Improve the area with Soil³ compost and check your levels: Add enough Soil³ organic compost to leave about a ½” between the top of your existing soil and the Soil³ you just added, then rake it smooth. You need to allow for the depth of your new sod so it will be even with the rest of your lawn.
Soil³ compost provides natural nutrients to encourage root growth of your new sod and also helps retain moisture. Our Soil³ Mini Cubes are the perfect size for your lawn patching job.
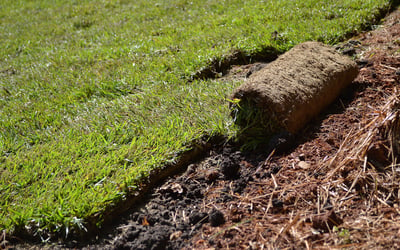
- Cut new sod to fit: Roll out the sod you purchased from your local Super-Sod and cut to fit the area using a machete or the same edging shovel you used to create the border.
Lay your new roll of sod over the top of the area to be patched. Use your shovel to cut down through the new sod and the existing grass below at the same time. This will give you a patch that exactly matches the size and shape of the hole below.
When you lay the patching piece, make sure the seams are tight - avoid any gaps along the edges that will cause the sod to dry out.
- Water, water, water: Immediately after you have laid it, grab your garden hose and water the new sod in well. Water every day for about 2 weeks and keep moist until the sod has rooted. Keep in mind that the smaller the piece you use to patch, the faster it will dry out.
How to Care for New Sod Patches
- Weed control: The best solution is to hand pull weeds. You can spot treat with a post-emergent herbicide only after you’ve mowed your new grass patches at least 3-4 times and your seams have disappeared. But be aware that post-emergent treatment can cause discoloration of your newly patched grass!
- Pre-emergent: Wait a full growing season after sod installation before applying pre-emergent herbicide to these areas of your lawn. Pre-emergent can adversely affect the roots of sod that isn’t established.
- Fertilizing: If you added a layer of Soil³ compost beneath your sod patches, it will provide natural nutrients to help the roots get established. You should follow the fertilizer schedule that coincides with your grass type and can be found in our lawn maintenance guides.
- Mowing: You can resume mowing immediately with a lightweight push mower or a robotic mower, but wait until your grass is rooted before mowing with a heavy, riding lawn mower. Don't wait too long - once it is rooted and it is growing, start mowing!

Patching a Larger Area of Sod
Sometimes you have a bigger area that needs to be improved - maybe as a result of heavy traffic, disease or poor drainage.
Make sure that you have resolved any underlying problems that caused the damage before you install new sod. The process for a large area is much the same as the steps above. Watch this video for some tips:
Call Super-Sod!
The next time you want to get your lawn looking its best, call your local Super-Sod at 1-888-360-1125 to order the material you need to make it happen. We sell individual rolls to make small jobs easy for you and you can also order sod online, right here on our website.
By the way… I think those three guys above copied our recipe to success since we’ve been offering a solution to impatient people for over 50 years!